by David Loo | May 1, 2013 | Sharepoint Development
If you are receiving this error “Invalid date/time value. A date/time field contains invalid data. Please check the value and try again.”. This is because the assigning value for the AfterProperties DateTime field in the ItemAdding or ItemUpdating event in the Event Receiver was not formatted correctly.
To resolve this issue you need to format the DateTime value to an ISO8601 string format:
properties.AfterProperties["StartDate"] = DateTime.Now.ToString("yyyy-MM-ddTHH:mm:ssZ");
or by using the SPUtility.CreateISO8601DateTimeFromSystemDateTime method:
properties.AfterProperties["StartDate"] = Microsoft.SharePoint.Utilities.SPUtility.CreateISO8601DateTimeFromSystemDateTime(DateTime.Now);
by David Loo | Apr 29, 2013 | Ubuntu
Just a couple of days ago Ubuntu 13.04 was released, so I decided to upgrade from 12.10 and realised that my network card is not working with the new 3.8.0-19 kernel. So I tried re-installing the Realtek driver which I had downloaded from their web site and it failed to install! So I did some searching over the Internet and found that someone had written a patch file to fix the driver.
First you will need to download the current r8168-8.035.00 driver from Realtek and extract it to your local folder:
$tar -xjf r8168-8.035.00.tar.bz2
Now download the r8168-8.035.00.patch file and save it the r8168-8.035.00 folder.
From the terminal change to the directory where you have extracted the folder:
$ cd r8168-8.035.00
In the driver’s folder enter the following command run the patch file:
r8168-8.035.00$ patch -p1 < r8168-8.035.00.patch
After the patch is complete, run the shell script to install the patched driver:
r8168-8.035.00$ sudo ./autorun.sh
That’s it you’re all done!
by David Loo | Apr 28, 2013 | Ubuntu
I have been playing with the new release of Ubuntu 13.04 aka Raring Ringtail, one of the new feature I have been testing out is the Social Media Lens or Gwibber Lens. Now Gwibber no longer exists on the menu with the envelope icon on the top right of the desktop, I hardly use it because it was slow on my computer and if I wanted to post something I will go directly to the web site like Facebook or Twitter.
To access the Social Media Lens holding down the Super + G key, the Super is also known as the Windows key on the keyboard. Now you will see the the lens appear before your eyes!
The other way to to access it is by pressing on the Dash icon on the launcher which is located on the top left with the Ubuntu logo.
Then below you can see the lens bar with several icons, home, application, documents, social media, music, photo and video. Select the social media icon you will see all you Facebook friends, Twitter tweets and so on.

by David Loo | Apr 27, 2013 | Ubuntu
Just recently there was a new release for Ubuntu and I have a few Ubuntu installed on virtual machines. I normally telnet to the machines to perform updates, and upgrades. To upgrade via the command line open your terminal and enter the following command:
$sudo do-release-upgrade -d
The switch -d checks if upgrading to the latest release version is possible.
by David Loo | Mar 19, 2013 | Sharepoint Development
In this blog post I will explain and demonstrate how to Add, Update and Delete a SharePoint List Item using the server side object model.
Adding a New Item
In the code sample below I obtain the current context and the web and get the list I would like to add the new item to. After I have assigned values to my fields I call an update method from the item.
SPWeb spWeb = SPContext.Current.Web;
SPList spList = spWeb.Lists["MyList"];
SPListItem item = spList.Items.Add();
item["Title"] = "Hello, world!";
item.Update();
Update an Existing Item
Updating an existing item from a SharePoint List is very similar to adding a new item, but the only difference is instead of calling Add() from the SPListItemCollection, I now call the GetItemById(int) from the SPList object. There are other ways of getting an item from a list and another one is GetItemByTitle.
SPWeb spWeb = SPContext.Current.Web;
SPList spList = spWeb.Lists["MyList"];
SPListItem item = spList.GetItemById(1);
item["Title"] = "Hello, world!";
item.Update();
Deleting an Existing Item
Deleting an existing item from a SharePoint List all I need to do is get the item I want from this list and then call the Delete method from the item object. That’s how easy it is.
SPWeb spWeb = SPContext.Current.Web;
SPList spList = spWeb.Lists["MyList"];
SPListItem item = spList.GetItemById(1);
item.Delete();
I hope the information I have provided in this post is useful to you.
by David Loo | Mar 17, 2013 | Design Patterns
Composite pattern is a collection of objects where one of the objects in the collection can branch out. When using this pattern it usually consist of the following elements a component, leaf and composite.
Component:
- is an abstraction of all components, including the composite ones.
- declares the interface for the objects in the composition.
Leaf:
- represents a leaf object in the composition.
- implements all the Component’s methods.
Composite:
- represents a composite component.
- implements methods for manipulating children.
- implements all Component’s methods
Below are some code snippet taken from the design-patterns repository from my github account, the console application is called Composite and uses a Parent (Composite) and Child (Leaf) objects to represent the use of the pattern.
IMember Interface:
The IMember interface represents the Component and it consist of a method signature called Print(). This interface will be implemented by the Parent and Child class and they will also implement the Print() method for outputing information, but I will explain this later.
using System;

namespace composite
{
public interface IMember
    {
        void Print();
    }
}
(more…)
by David Loo | Feb 26, 2013 | ASP.NET, Sharepoint Development
I have been working on a project recently that require the use of the SPGridView web control and realise that it doesn’t auto generate columns for you, even if you set the property to true it will complain. So to overcome this issue I had to write a some code to achieve what I want it to do.
First I need to use the BoundField for setting up the column and binding to a SharePoint List and there is two properties that I need to set, which is the HeaderText for the column display text and DataField for binding to the list’s field.
To set these two properties I need to instantiate a SPList and get the list’s SPView object that I need, when I have the SPView object I can iterate through the ViewFields collection to get each of the field internal names for setting the DataField property and to get the display name I had to take the current list’s SPField collection and use a method called GetFieldByInternalName to return a SPField. Then I use the SPField Title property to set the HeaderText property.
private void GenerateColumns(SPGridView spGridView, string listName, string viewName)
{
    var spWeb = SPContext.Current.Web;
    var spList = spWeb.Lists[listName];
    var spView = spList.Views[viewName];
    var spFields = spList.Fields;

    foreach (string intNameField in spView.ViewFields)
    {
        var spField = spFields.GetFieldByInternalName(intNameField);
        if (spField != null)
        {
            var boundField = new BoundField
                {
                    HeaderText = spField.Title,
                    DataField = intNameField
                };
            spGridView.Columns.Add(boundField);
        }
    }
}
Now I have the created method to auto generate the columns I need to make sure the datasource I am binding to the SPGridView control contains the same internal field name of the list or else the code above won’t work.
by David Loo | Sep 23, 2012 | Sharepoint Development
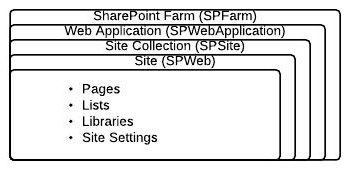
I writing this post to let others understand the basics of the SharePoint hierarchy and the Object Model. I know as a developer it can get confusing with the terminologies. This post I would like to address the main areas of the hierarchy and explain their purposes:
Farm:
The farm is a collection of
- front end web servers – these are the web site or also known as web applications
- application servers – these are the servers that provide the back end services such as searching, office services and etc.
- databases servers – these are the servers that stores the configuration content of the whole farm.
In the SharePoint Object Model the SPFarm class is the first tier of the hierarchy, this class consist of two properties:
- Servers – this property gets all the servers in the farm in a collection of SPServer objects.
- Services – this property gets all the services in the farm in a collection of SPService objects. (more…)
by David Loo | Sep 22, 2012 | Git
If you want to see a history of commits you must use the following command:
$git log
The history will show the Commit Identification Number, Author, Date, and the commit message that was entered by the developer.
commit f78250ca8f938a6a427e37b6b8aedc8cc1a59c22
Author: David Loo
Date:   Sun Sep 16 21:21:50 2012 +0800

hello

commit dbf4aa15c50ccaec3a075399e336c0c49934122a
Author: David Loo
Date:   Sun Sep 16 21:20:51 2012 +0800

Hello

commit a204716d55aad334e5fc669fa1f9d611012461cb
Author: David Loo
Date:   Sun Sep 16 21:00:11 2012 +0800

Insertion

commit 2aaa14f6d89d75156db8f9a08a903ad83d471f92
Author: David Loo
Date:   Sun Sep 16 20:57:12 2012 +0800
If you want to view the individual commits that are listed above you can use the show command followed by the commit identification number: (more…)
by David Loo | Sep 16, 2012 | Git
In Git when new content is added or modified, it needs to be committed as the latest version in the repository. To commit any changes open a terminal and from the command prompt enter the following command:
$cd HelloWorld
$echo "Made some changes" >> index.html
$git commit index.html -m "Made some changes"
The above commands will make a change to an existing file called index.html, and then commit the change with a log message.
If you have several changes and you commit all this changes, you can perform the following command:
$git add .
$git commit -m "Made some changes"
The above command performs a batch add and commit with a single log message. These commands can be entered in single line by specifying an add -a swith along with the commit command:
$git commit -a -m "Made some changes"
When the content is committed and just right after the command was entered, it will show the number of files and insertions (changes).
Reference: